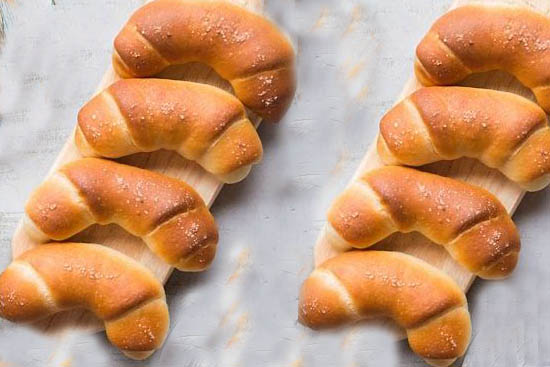
What is shio pan?
Shio means salt and pan means bread in Japanese.
Shio pan IS NOT a croissant despite it is shaped like one. It doesn’t have the layers like croissant is. Shio pan is a bread stuffed with a butter stick and shaped like a croissant/crescent roll. When they are baked, the butter melts during baking and will crisp up the bottom part of the bread, making them incredibly tasty.
Ingredients
–400 grams bread flour
–120 grams cake flour
–30 grams non-fat milk powder
–26 grams sugar
–10 grams salt
–365 grams ice-cold water
–40 grams cold unsalted butter, coarsely grated straight from fridge
–7 grams instant dry yeast
–12 (15-gram) chunks butter
–Flaky salt
Preparation
How To Make Shio Pan (Japanese Salt Bread)
STEP 1: Add both flours, sugar, salt, and non-fat milk powder to the bowl of a stand mixer fitted with the dough hook attachment. Pour in the cold water — and yes, it really does need to be cold. I stuck mine in the fridge overnight to make sure it was properly chilled, but if you forgot, tossing a couple of ice cubes in your water for a minute works too. Mix everything on low speed until it comes together into a shaggy, slightly messy-looking dough.
STEP 2: Next up: the butter. And just like the water, it should be cold straight from the fridge, not softened. Add the unsalted butter to the dough, then bump the mixer up to medium speed and let it knead until smooth, 15 to 25 minutes.
It is sticky, and you will be tempted to add more flour. Resist the urge and trust the process. Keep kneading and check in every five minutes or so to do a quick windowpane test (stretching a small piece of dough until it's translucent enough that light can shine through it). Once the dough pulls cleanly away from the bowl and stretches thin without tearing right away, you’re good to go.
STEP 3: Shape the dough into a tight, smooth ball and place it back in the bowl. Cover it and let it rise until doubled in size.
STEP 4: While the dough rises, cut the salted butter into small 1-inch pieces. These will go inside the rolls later and create that signature buttery center.
STEP 5: Once the dough has doubled, give it a quick poke test. If you press a finger into the center and the indent stays put without springing back, it’s ready. Gently punch the dough down,then divide it into 80-gram portions. 12 pieces total.
STEP 6: Roll each portion into a smooth ball. Cover them with a towel and let them rest for 15 minutes.
STEP 7: Shaping. Take one dough ball and roll it into a long teardrop shape, with a wide top and narrow bottom. Using a rolling pin, start from the center and flatten the bottom half of the dough, lightly stretching it with your hand as you go. Then, flatten the wider top half.
STEP 8: Place a piece of salted butter on the wide end of the dough. Starting there, roll the dough down toward the narrow tip, tucking and guiding it with your fingers as needed so everything stays snug.
STEP 9: Place the shaped rolls seam-side down on a baking tray. Cover and let them rise again until doubled in size, about one hour.
STEP 10: Preheat the oven to 450°F. Brush the rolls with water, then top each one with flaky sea salt.
STEP 11: Right before baking, give each roll a generous second spray of water. Then lower the oven temperature to 400°F and bake for 12 to 15 minutes, rotating the pan halfway through.
As soon as the rolls come out of the oven, brush them with the butter that melted out during baking. It might be the best step of the entire process. Don’t skip it.
What makes them so special: soft, fluffy bread, a buttery interior, that signature crispy bottom, and just the right hit of salt on top.